Algorithm
This Course is about generative Design and generative Algorithms. The work arose with the help of processing in the Course Input/Output of the FH Potsdam.
PRJ1_GrowingLines
In the first part of the course we learned what algorythms are, and how they are structured. We also learned the basics of the programming language Processing and lerned what generative Design is.
IDEA
Our first contact with Programming language we got with the language we already learned: Our own verbal language. The exercise was to simply (or event harder then thought) formulate an algorythm that later had to be solved by the coursemates. After several changes in details and complexity the final code looked like this (german):
1. Wähle eine Farbe danach, wie warm du dich im Moment fühlst (zB. eine warme Farbe, Orange oder Gelb, wenn es dir Wohlig warm ist)
2. Male damit einen Punkt in die Mitte des Blattes
3. Ziehe von diesem Punkt vier 1,5 cm lange, Linien nach oben, nach unten, nach rechts und nach links.
4. Zeichne an das Ende der Linien eine weitere Linie, die im 90 Gradwinkel nach rechts und nach links verläuft.
5. Wenn du lieber im Süden Urlaub machen würdest, als im Norden, wähle nun die nächst wärmere Farbe der Kreiden, sonst die nächst kühlere
6. Zeichne mit dieser Farbe 8 neue Linien mit ca. 1 cm Länge an die  Enden deines Konstruktes, wobei diese in Richtung des nächsten Blattrandes verlaufen.
7. Du hast jetzt 8 Enden.
8. Schaue auf die Uhr.
    - Wenn es vor 12 Uhr ist, zeichne von jedem Ende eine Linie nach links.
    - Wenn es zwischen 12 und 16 Uhr ist, zeichne Linien nach rechts und nach Links
    - Wenn es nach 16 Uhr ist, zeichne eine Linie nach rechts
9. Schaue auf die Farbe deines Oberteils. Wenn du sie als kühl empfindest, nehme den nächst wärmeren Farbton der Kreiden. Wenn du die Farbe als warm empfindest, nehme den nächst kühleren Farbton
10. Zeichne mit diesen wieder Linien mit ca 1cm von den Enden in Richtung Blattrand
11. Wenn du jetzt 8 Enden hast, ziehe von jedem ende einen strich nach rechts und nach links. Wenn du 16 Enden hast kannst du wählen: Ziehe einen Strich nach rechts, nach links oder nach rechts und links.
12. Nehme die Farbe, die dir am besten gefällt. Zeichne damit  nun wieder von den Enden ausgehend Linien zum Blattrand. Mache sie so lange, bis du den Blattrand erreichst.
13. Fahre beginnend in der Mitte jeden Strang mit dem Finger nach, und verschmiere die Kreide so ein wenig.
14. Vielen Dank für deine Hilfe!
Results:

REALISATION - Software
The next exercise was to translate ower human code into processing. Fabian Moron Zirfás, our tutor, gave us some basics and much help.
I really was pretty confident with myself, because processing was the first programming language I ever used at this moment, and I was happy to see, that I could at least do something with it, even if it was far away, from what I wanted to do. After some hours of pure processing practise, I decided to look for a way to translate my human code into processing. I built some Versions with Recursion with the help of the book "Generative Gestaltung" of Hartmut Bohnacker, Benedikt Groß and Julia Laub.
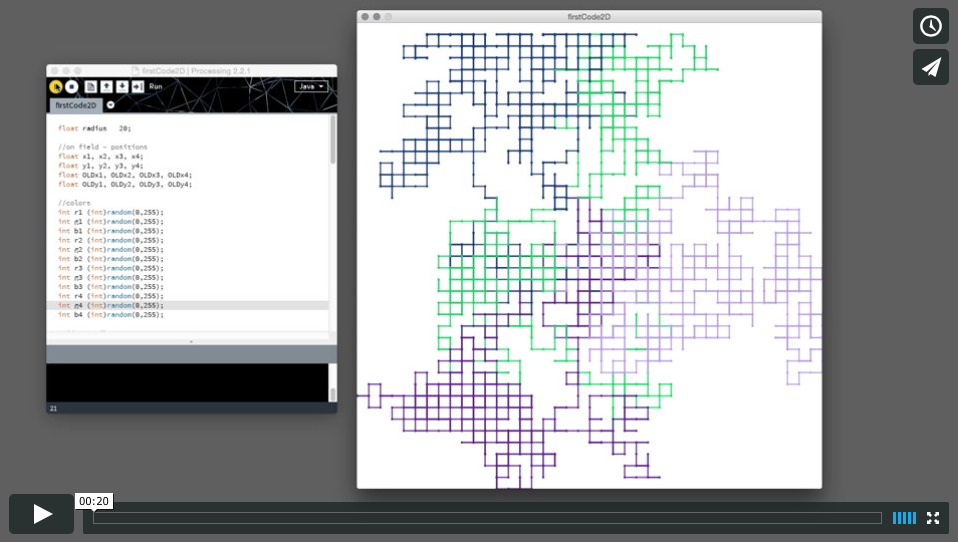
On my way towards goal I found a really nice Idea, which I prefered compared to the Recursion-Version of my code: A straight line would run over the screen, it would always "stop" after a certain length, choose a random direction in the angle of 90° including the one it came from, and then go on towards this direction.
My first code looked like this:
  float radius = 20;

  //on field - positions
  float x1, x2, x3, x4;
  float y1, y2, y3, y4;
  float OLDx1, OLDx2, OLDx3, OLDx4;
  float OLDy1, OLDy2, OLDy3, OLDy4;

  //colors
  int r1=(int)random(0,255);
  int g1=(int)random(0,255);
  int b1=(int)random(0,255);
  int r2=(int)random(0,255);
  int g2=(int)random(0,255);
  int b2=(int)random(0,255);
  int r3=(int)random(0,255);
  int g3=(int)random(0,255);
  int b3=(int)random(0,255);
  int r4=(int)random(0,255);
  int g4=(int)random(0,255);
  int b4=(int)random(0,255);

  void setup(){
  size(800,800);
  background(255);
  x1 = x2 = x3 = x4 = width/2;
  y1 = y2 = y3 = y4 = height/2;
  OLDx1 = OLDx2 = OLDx3 = OLDx4 = x1;
  OLDy1 = OLDy2 = OLDy3 = OLDy4 = y1;
  frameRate(60);
  }

  void draw()
  {
  //define new angle
  float angle =(TWO_PI/4) * floor(random(-4,4));
  x1 += cos(angle)*radius;
  y1 += sin(angle)* radius;
  angle =(TWO_PI/4) * floor(random(-4,4));
  x2 += cos(angle)*radius;
  y2 += sin(angle)* radius;
  angle =(TWO_PI/4) * floor(random(-4,4));
  x3 += cos(angle)*radius;
  y3 += sin(angle)* radius;
  angle =(TWO_PI/4) * floor(random(-4,4));
  x4 += cos(angle)*radius;
  y4 += sin(angle)* radius;

  //prohibit offscreen points
  if (x1<0 || x1>width || y1<0 || y1>width){
  x1 = OLDx1;
  y1 = OLDy1;
  }
  if (x2<0 || x2>width || y2<0 || y2>width){
  x2 = OLDx2;
  y2 = OLDy2;
  }
  if (x3<0 || x3>width || y3<0 || y3>width){
  x3 = OLDx3;
  y3 = OLDy3;
  }
  if (x4<0 || x4>width || y4<0 || y4>width){
  x4 = OLDx4;
  y4 = OLDy4;
  }

   //set angle points
  strokeWeight(4);
  stroke(r1, g1, b1);
  point(x1,y1);
  stroke(r2, g2, b2);
  point(x2,y2);
  stroke(r3, g3, b3);
  point(x3,y3);
  stroke(r4, g4, b4);
  point(x4,y4);

  //draw lines
  strokeWeight(2);
  stroke(r1, g1, b1);
  line(x1,y1,OLDx1, OLDy1);
  stroke(r2, g2, b2);
  line(x2,y2,OLDx2, OLDy2);
  stroke(r3, g3, b3);
  line(x3,y3,OLDx3, OLDy3);
  stroke(r4, g4, b4);
  line(x4,y4,OLDx4, OLDy4);

  //save old points for backup
  OLDx1 = x1;
  OLDy1 = y1;
  OLDx2 = x2;
  OLDy2 = y2;
  OLDx3 = x3;
  OLDy3 = y3;
  OLDx4 = x4;
  OLDy4 = y4;
  }
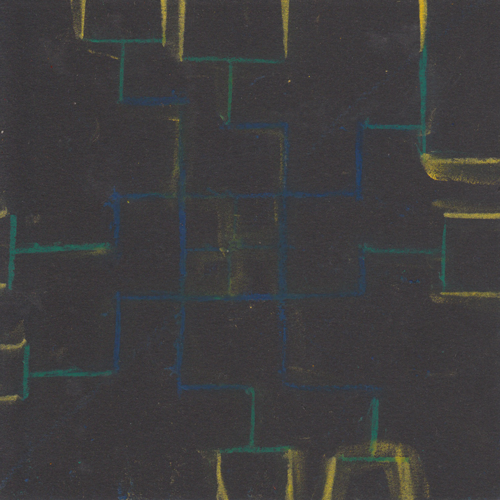
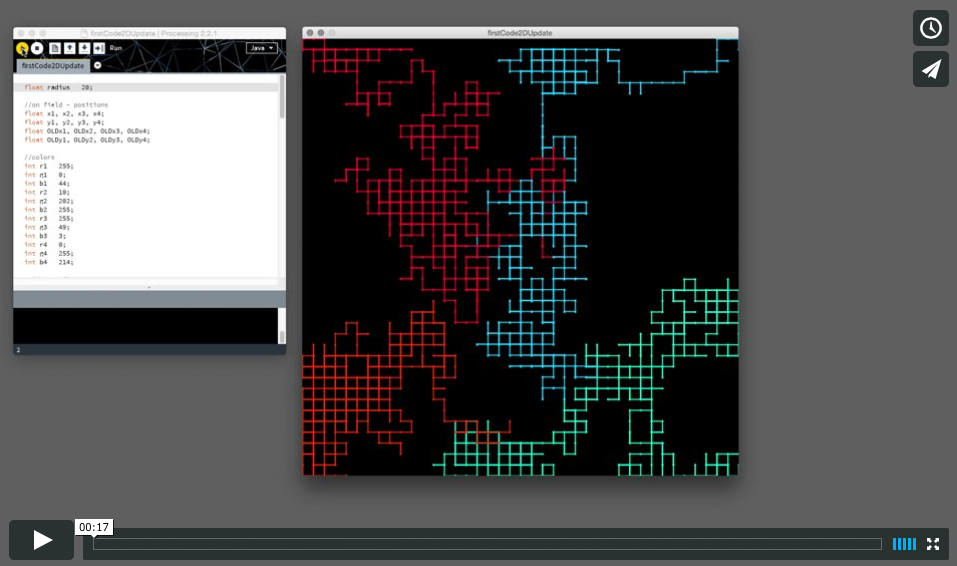
Although I was pretty proud of my first solution I still didn't find it visually attractive all times you started it. The colors where to random, and often didn't fit to each other, so I decided to specify four colors. Also I found out that the occuring pictures often looked better, when the starting points of the four colors where in the edges. After some rework time, my code Looked like this:
The final 2D Version:
  float radius = 30;

  //on field positions
  float x1, x2, x3, x4;
  float y1, y2, y3, y4;
  float OLDx1, OLDx2, OLDx3, OLDx4;
  float OLDy1, OLDy2, OLDy3, OLDy4;

  //colors
  int r1 = 255;
  int g1 = 0;
  int b1 = 44;
  int r2 = 10;
  int g2 = 202;
  int b2 = 255;
  int r3 = 255;
  int g3 = 49;
  int b3 = 3;
  int r4 = 0;
  int g4 = 255;
  int b4 = 214;

  void setup(){
  size(800,800);
  background(0);
  x1 = x3 = 0;
  x2 = x4 = width;
  y1 = y2 = 0;
  y3 = y4 = height;
  OLDx1 = OLDx3 = x1;
  OLDx2 = OLDx4 = x2;
  OLDy1 = OLDy2 = y1;
  OLDy3 = OLDy4 = y3;
  frameRate(60);
  }


  void draw()
  {

  //define new angle
  float angle =(TWO_PI/4) * floor(random(-4,4));
  x1 += cos(angle)*radius;
  y1 += sin(angle)* radius;
  angle =(TWO_PI/4) * floor(random(-4,4));
  x2 += cos(angle)*radius;
  y2 += sin(angle)* radius;
  angle =(TWO_PI/4) * floor(random(-4,4));
  x3 += cos(angle)*radius;
  y3 += sin(angle)* radius;
  angle =(TWO_PI/4) * floor(random(-4,4));
  x4 += cos(angle)*radius;
  y4 += sin(angle)* radius;

  //prohibit offscreen points
  if (x1<0 || x1>width || y1<0 || y1>width){
  x1 = OLDx1;
  y1 = OLDy1;
  }
  if (x2<0 || x2>width || y2<0 || y2>width){
  x2 = OLDx2;
  y2 = OLDy2;
  }
  if (x3<0 || x3>width || y3<0 || y3>width){
  x3 = OLDx3;
  y3 = OLDy3;
  }
  if (x4<0 || x4>width || y4<0 || y4>width){
  x4 = OLDx4;
  y4 = OLDy4;
  }

  //draw lines
  strokeWeight(2);
  stroke(r1, g1, b1);
  line(x1,y1,OLDx1, OLDy1);
  stroke(r2, g2, b2);
  line(x2,y2,OLDx2, OLDy2);
  stroke(r3, g3, b3);
  line(x3,y3,OLDx3, OLDy3);
  stroke(r4, g4, b4);
  line(x4,y4,OLDx4, OLDy4);

 //set angle points
  strokeWeight(4);
  stroke(r1, g1, b1);
  point(x1,y1);
  stroke(r2, g2, b2);
  point(x2,y2);
  stroke(r3, g3, b3);
  point(x3,y3);
  stroke(r4, g4, b4);
  point(x4,y4);

  //save old points for backup
  OLDx1 = x1;
  OLDy1 = y1;
  OLDx2 = x2;
  OLDy2 = y2;
  OLDx3 = x3;
  OLDy3 = y3;
  OLDx4 = x4;
  OLDy4 = y4;
  }
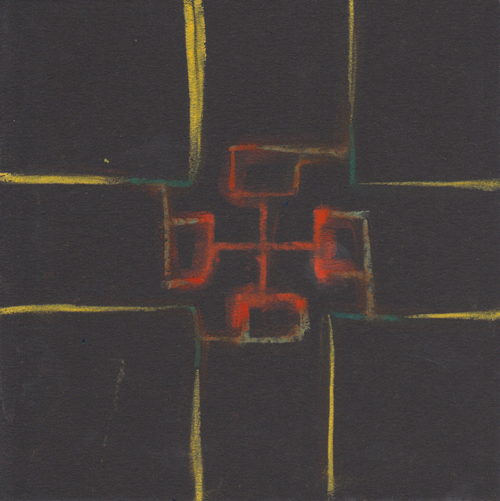
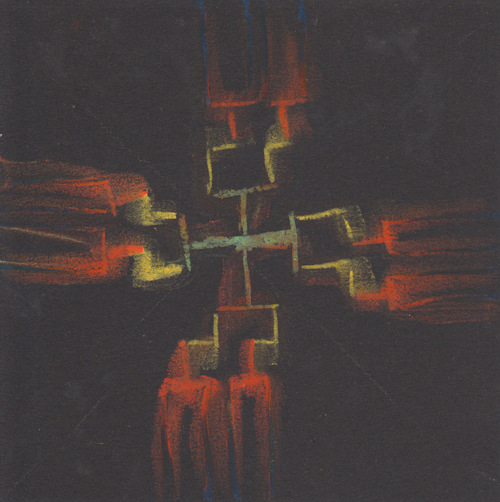
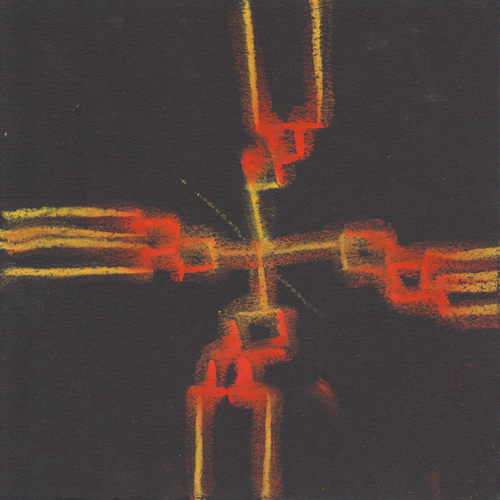
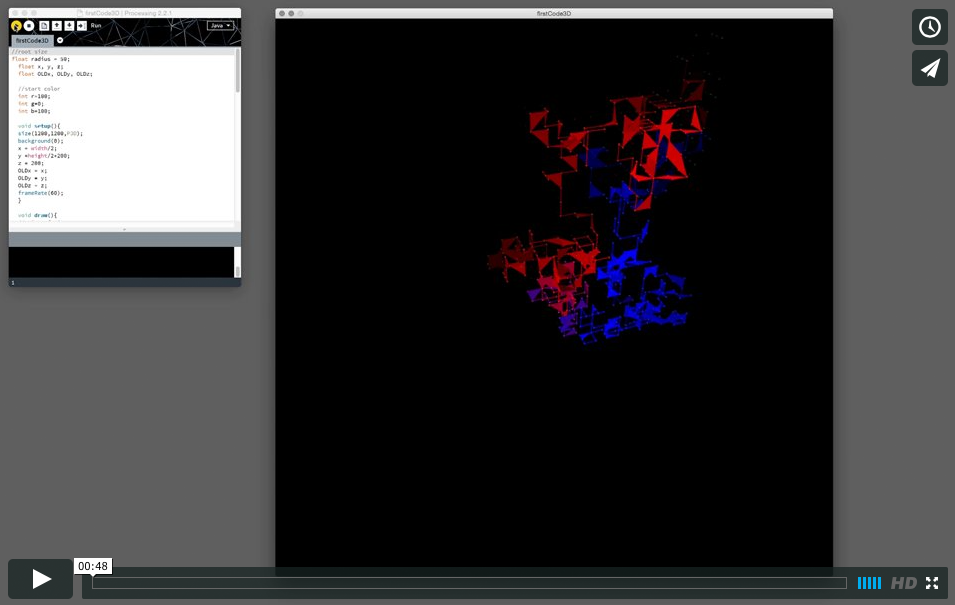
My 2D solution was now done, and as you would eventually now spaculate, I took the opportunity to built a 3D Version.
In the threedimensional solution decreased the lines to 1 single line, after I recognized, that 4 lines would be way to much to differenciate because the third dimension gave the construct a pretty high amount of visual complexity compared to the erlier version.
For an improved visual clarity I developed a kind of 3rd-dimension color: As the line moves in the z-dimension, the color gets warmer (nearer) and colder (further). The color scheme ranges from dark blue to red.
The final 3D Version:
//root size
float radius = 50;
  float x, y, z;
  float OLDx, OLDy, OLDz;

  //start color
  int r=100;
  int g=0;
  int b=100;

  void setup(){
  size(1200,1200,P3D);
  background(0);
  x = width/2;
  y =height/2+200;
  z = 200;
  OLDx = x;
  OLDy = y;
  OLDz = z;
  frameRate(60);
  }

  void draw(){
  //point of view
  rotateX(-0.7);
  rotateY(0.34);

  //draw
  fill(r,g,b);
  stroke(r+50,g+50,b+50);
  strokeWeight(4);
  point(x,y,z);
  stroke(r,g,b);
  strokeWeight(2);
  beginShape();
  vertex(OLDx,OLDy,OLDz);
  vertex(x, y, z);

  //backup old values
  OLDx = x;
  OLDy = y;
  OLDz = z;

  //define new x, y, z
  int q = (int)random(12);
  if(q==1){
  x = x+radius;
  }
  if(q==2){
  x = x-radius;
  }
  if(q==3){
  y = y+radius;
  }
  if(q==4){
  y = y-radius;
  }
  if(q==5){
  z = z+radius/2;
  r=r+30;
  b = b-30;
  }
  if(q==6){
  z = z-radius;
  b=b+30;
  r = r-30;
  }

  //prohibit vertex to run out of screen
  if(y<0 || y>height||x<0 || x>width||z<0 || z>height/4){
  y = OLDy;
  x = OLDx;
  z = OLDz;

  //prohibit colorvalue to run out of range
  }
  if(r>255){
  r=255;
  }
  if(b>255){
  b=255;
  }

  vertex(x, y, z);
  endShape();
  point(x,y);
  if(mousePressed){saveFrame();}
}
FINISH
For the final presentation we also had the exercise to find an application for our programmed algorythm. This could be in form of an object or a 2D print. The goal was to get the code into the real world again, after we transfered it in computer-understandable language.
I had the Idea to use the pattern generated in the 2D-Version in my Code to integrate it in a Lamp. First I built a construct with wood, which was drilled and then interwoven with fishing line. Then I used wool to generate the pattern in the with boulter generated network.
At the end I covered the free areas with black carton and recessed a lightbulb and composure.